Monday, January 11, 2016

Team Yankee: First Defense of the Fulda Gap

Hey Folks, 

After reading about Adams blogpost about using 6mm models for Team Yankee Andy (of  http://andysarmies.blogspot.co.nz/) decided to try it out as well. 

Sadly we had no rulebook for Team Yankee as yet so just went with what we had gleaned from the net and from our rusty memories of how Flames works. Or we just made it up. Good times! 

We went with small 50 point forces where I had Bundeswher (counting as Yanks) and Andy had Russians 

German Panzergrenadier Kompanie


  • Command with Marder (M113) 
  • 2 Short (5 stand) Panzergren Platoons with Marders and 2 Milan (Dragons) each 
  • 2 Platoons of 2 Rakete Jgadpanzers (M901 ITV's) each 
  • 1 Platoon of 2 Flakpanzer Gepards (M163 Vulcans) 
  • 1 Platoon of 4 Leopard II's (M1 Abrams) 
Russian Red Banner Tank Battalion

  • Command T72
  • 7 (?) T72s
  • 5 T72s
We decided to just halve the distance in inchs and this worked pretty well! Gave a nice visual on ranges and movements. 

Mission was Free for All as it was easy :) 

We played on a Winter table with some suspiciously tropical looking buildings...

 3' by 4' was equivalent to an 6' by 8' board so a heap of room to deploy. We played across the 3' 
 The Russian have siezed the town and the woods on its outskirts 
Turn 1: The German Leopards bound up the center why one Panzergren platoon flanks towards the top left of the town. Long range missile fire from the Jadgpanzers on the ridge line and in the central woods only succeed in Bailing a T-72. The Soviet Tank Company in the town moves up and tags a Marder...one team survives and bails out. They also bail a Leopard at long range.
Turn 2: The Leopards move up to support the Panzergrens (who are now cornered on the outskirts of the town) and engage the T-72s to no effect. Soviet return fire is devastating with  one Leopard destroyed and another bailed. With only one active Leopard the platoon retreats and leaves the Panzergreens to their fate...
Turn 2 - Continues to be painful for the Germans...with one platoon of Jgadpanzers knocked out after Andy rolls the 6 he needs to hit one at range (and concealed, with GTG) and the remaining vehicle retreats. 
Turn 3: The Soviets continue to press the attack while the remaining Jagdpanzer platoon just cant scratch the T-72s in the fields. Return fire destroys one and bails the other (who then scarpers as I cant roll courage tests it seems!) The Panzergrens desperately try an shelter in the buildings but massed 125mm HE rounds are starting to cause casualties. 
Turn 4: The Panzergrens in the town manage to bag the enemy CO with a MILAN before finally succumbing to the guns of the T-72's in the town. 
Turn 5: The Germans are holding on to the bitter end and a lucky MILAN shot from the Panzergrens on the ridge takes out a T-72. Its too little to late as the Soviets drive on the central objective...
Endgame: The Soviets smashed the Germans and the advance into Western Germany Continues! 

Overall Thoughts: Fun - I love playing Moderns and I used to play ALOT of Flames of War so it was quite easy to pick up. It was somewhat hard without a rulebook but seemed to flow pretty well. 

Andy and I are quite keen to stat up the Middle East as we have buckets of Israelis, Jordania/ Iranians and Iraqis between us...and we don't have to make a whole new terrain set! It shouldn't be too hard to extrapolate from Team Yankee stats back to the other units available. Having a small points system also makes costing things alot easier.

Cheers
Jason


Tuesday, January 5, 2016

Warclouds: Craig Parker FTW!

Hey Folks, 

So 2016. I wont bore you with a "New Years Post" as I am notoriously bad at posting anyway...but plan to keep up a bit this year anyway. 

This year starts with Craig Parker...


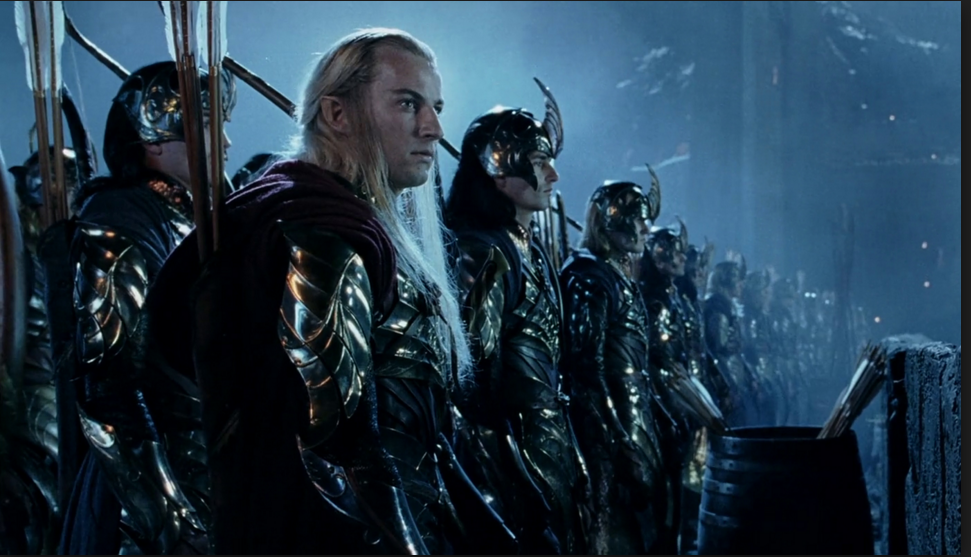
As I have this WIP for Warclouds (on Waitangi Weekend) 


A whole heap of OOP Metal Lord of the Rings Elveses square based for Warhammer/ 9th Age/ KoW/ whatever system lets me throw down dice and drink beers. 

Updates at some point 

Cheers,
Jason

Tuesday, September 8, 2015

Star Wars Armada: Epic 4 Player Game

Hi Folks,

Ben, Chris and John came around on Saturday for an epic game of Star Wars Armada! 

We just rolled with every ship we had between us and painted ships only.

Imperial Brief (John and I) was to strike a hammer blow to the rebellion by knocking out a resupply base and destroy any military forces and transport vessels. 

Rebel Brief (Ben abd Chris) was to evacuate crucial supplies and personal while delaying and damaging the Imperial Attack...

To keep it simple we didn't use points but assigned an upgrade card per command value point, with the Rebels getting an extra card per ship. Likewise the Rebels had all the aces while Imperial's were standard squadrons...

Sadly Jamie was stricken with the plague so it ended up with the Rebels being heavily outnumbered...

 Imperial's line abreast. 5 Victory Class ISD's lead by Tarkin and Vader. 4 Gladiators. Around 25 squadrons...
 Rebel defenders...2 each of each class and 6 squadrons! Oh and an armed Space Station and 3 weapon platforms
 Imperial's advance at flank speed!
 Fleets start to engage
 Massive fighter brawl!
 Imperial Plan: Straight up the middle all subtle like.
 Starting to get messy...the first ISD goes down
 Rebels kiting...meanwhile the Rebel Aces lurking near Galleby Haven are mincing my fighters.
 Nearing end game. 3 ISDS and a Gladiator down. 2 rebel transports have escaped but the station and weapon platforms are destroyed.
And it's over!

We had victory points per destroyed cap ship (based on size), for the station and for transports away. In the end it was 14 points each so we gave it too the rebels as they were so heavily outnumbered!

Good game guys - looking forward to reprising it when Wave 2 is out :)

Cheers 
Jason 


Friday, August 14, 2015

Star Wars Armada: Converted Rebel Assault Frigate

Hey Folks,

So I've never been a fan of the Rebel MkII Assault Frigate as I've always prefered the Mk1. I then proceeded to cut my previous painted ship up (as I do...)

Oh and I painted some squadrons :)

Sunday, August 9, 2015

Star Wars Armada: Encounter at Epsilon IV

Hey Folks,

Got my first game of Star Wars Armada in with the Rebels in a 400pt bash vs Ben at my place.


I had 2 Mk2 Assault Frigates (with enhanced batteries and gunnery teams of course), a support frigate with Leia and 2 Corvette B's. So 5 ships!  Also had 2 each no name X-wing's, A-wing's and Y-wing's. Lead by Dodonna

The Imperial Opressors had 2 Victory's  (one a II with Tarkin, one a I with Dominator and Assault Missiles!), the Gladiator Insidious, 4 TIE's, an advanced, a Bomber,  Vader and Rhymer.
The mission was Intel Sweep 2hich I thought should favour me but...

Imperial's had the initiative so they lumber forward with Dominator moving near the first objective, a weapons platform. My 1st space whale (on loan from Ben) moves to investigate a fuel depot while the corvettes swing wide and my flagship assault frigate (the converted one) and Leia's Nebulon B lurk centrally. Squadron play so much jockeying for position while a sneaky TIE manages to engage the lead x-wing.


Turns 2 and 3 saw the Assault frigates dive past Tarkin's flagship in order to avoid getting nailed by the Gladiator. I cut this a bit close with the space whale and he clipped Tarkin's Victory but thankfully didn't get stuck on the front!  I managed to avoid taking too much damage from the Gladiator but Ben was slowly wining the fighter war and I wasnt able to do enough damage to the Star Destroyers.


Turn 4 and 5 saw Dodonna's flagship destroyed on the edge of the gas cloud. One of the corvettes played chicken with the Gladiator too long and eventually Bens black dice of death got it. Meanwhile Leia's Nebulon B took a brutal hit from Tarkin's Victory which almost one shotted it...until Tarkin promptly ordered Ramming speed and crushed her :( 

The space whale and a corvette managed to escape the trap but we only had one objective to the Imperial's two. I could of got another one but might have died anyway and the fighters where all but gone so...jump to Hyperspace! 

Thanks for the great game Ben! Rebels are different but I like how they play. You drove your fleet very well and it punished me when I made mistakes! Keen for a rematch!

Cheers
Jason


Sunday, June 7, 2015

Star Wars Armada: Rebel Asteroid Base

Hey Folks,

This is my scenary from a game along, long time ago

http://krugerskreations.blogspot.co.nz/search/label/BFG%3A%20Star%20Wars?m=1

Drybrushed, touched up abd good to go for Armada. Yes I know I'll need to rebate the asteroids on smaller fields but it'll do for now.

The "Rebel Transport" GR-75s are from the Wizards of the Coast Starship Battles games. While too big for BFG they are pretty close to scale for Armada. Also repainted and touched up.  I reckon they might fit on Squadron Bases easily enough...will be good for objectives and convoy scenarios :)

Thanks, 
Jason

Saturday, May 30, 2015

Star Wars Armada: INS Warlord

Hey Folks,

Long time no Blog!

I've been busy with a new Job but have been doing a bit of gaming recently, mainly Warhammer Fantasy, 40k and now Star Wars Armada.

Played my first game the other night vs Jamie and it was awesome!. So I bought a Victory class Star Destroyer the next day...and me being me personalized it :)

Yes that's "Warlord" in Galactic Basic on the bridge superstructure. I'm so nerdy!

Cheers
Jason